In today’s digital world, chatbots/search bots have become increasingly popular for automating tasks and providing efficient customer support. One powerful chatbot tool is ChatGPT, developed by OpenAI, which utilizes Natural Language Processing (NLP) to interact with users in a human-like manner.
In this article, we will explore how to build a search bot integrated with ChatGPT in Node.js, a versatile and widely used JavaScript runtime. By following the step-by-step guide provided, web developers can leverage the capabilities of ChatGPT to create an intelligent search bot that can retrieve relevant information from a website and provide accurate responses to user queries.
Let’s dive in!
Pre-Requisites
Before diving into building a search bot integrated with ChatGPT in Node.js, there are a few pre-requisites that developers must fulfill:
- Node.js Installation: Ensure that Node.js is installed on your machine. You can download and install the latest version from the official Node.js website.
- OpenAI API Key: To utilize the ChatGPT API, you need to obtain an API key from OpenAI. Sign up for an account on the OpenAI platform and generate an API key to access the ChatGPT functionality.
- Project Setup: Set up a new Node.js project and initialize it using the
npm initcommand. This will create apackage.jsonfile to manage project dependencies. - Dependencies Installation: Install the necessary dependencies for your project, including Express for the web server and the OpenAI JavaScript library for the API. Use the command
npm install express openaito install these dependencies.
With these prerequisites in place, we can now move on to building the search bot integrated with ChatGPT.
Understanding the Usefulness of Search Bots
Search bots are valuable tools that can enhance user experiences on websites and applications. They enable users to quickly and efficiently retrieve relevant information without manually navigating through pages or performing complex search queries. Search bots can be particularly useful in scenarios such as:
- Knowledge Base Retrieval: When a website has a vast amount of information stored in its pages or databases, a search bot can help users find specific information by searching through the content and providing accurate results.
- E-commerce Product Search: On e-commerce platforms, search bots can assist users in finding the products they are looking for by querying the product database and displaying relevant results based on user input.
- Customer Support: Search bots can be integrated into customer support systems to provide instant answers to frequently asked questions. This reduces the workload on support agents and ensures that users receive prompt and accurate responses.
Now that we understand the usefulness of search bots, let’s proceed with the step-by-step process of building one integrated with ChatGPT.
Step 1: Setting Up the Node.js Project
To start building the search bot, we need to set up a Node.js project and install the necessary dependencies. Follow these steps:
- Create a new directory for your project and navigate into it using the command line:
mkdir search-bot
cd search-bot
- Initialize the project by running the command
npm init. This will create apackage.jsonfile to manage project dependencies. - Install the required dependencies, including Express and the OpenAI JavaScript library, using the command:
npm install express openai dotenv --save
npm install nodemon --save-dev
- Create a new file called
index.jsto write the code for our search bot:
touch index.js
With the project set up, we can now proceed to the next step.
Step 2: Creating an Express Server
In this step, we will create an Express server to handle HTTP requests and serve our search bot application. Open the index.js file and add the following code:
const express = require("express");
const path = require("path");
const app = express();
const { OpenAI } = require("openai");
require("dotenv").config({ path: ".env" });

// openai api key settings
const openai = new OpenAI({
  apiKey: process.env.OPENAI_API_KEY
});

app.use(express.json());
app.use(express.urlencoded({ extended: false }));
app.use(express.static(path.join(__dirname, "public")));

// app listening on port 3000
app.listen(process.env.PORT || 3000, () => {
    myLog(`Server started on http://localhost:${process.env.PORT || 3000}`);
});
Make sure to replace "OPENAI_API_KEY" with your actual OpenAI API key. This code sets up the server, initializes the OpenAI API with the provided key, and listens for incoming requests on port 3000.
Step 3: Creating Routes for Search Queries
Next, we need to create routes in our Express server to handle search queries. Add the following code to the index.js file:
// API GET to handle search requests
app.post("/search-bot", (req, res) => {
  const { my_prompt } = req.body;

  openai.completions
    .create({
        role:'system',
        prompt: `search ${my_prompt}`,
        model: "text-davinci-002", //'gpt-3.5-turbo'
        temperature: 0.5,
    })
    .then((response) => {
      res.send(response.choices[0].text);
    })
    .catch((err) => {
      if (err instanceof OpenAI.APIError) {
        // console.log(err.status); // 400
        // console.log(err.name); // BadRequestError
        // console.log(err.headers); // {server: 'nginx', ...}
        // console.log(err.error.code); // Error code from OpenAI
        res.send(`Oops! technical issues. ${err.error.code}: ${err.error.message}`);
      } else {
        throw err;
      }
    });
});
This code defines a POST route /search-bot that accepts a query in the request body. It uses the OpenAI API to generate a completion based on the query and sends the response back to the client.
Step 4: Creating the User Interface
To interact with our search bot, we need to create a user interface. We will create a simple HTML template that includes an input field for the user’s query and a div to display the search bot’s response. Add the following code to the index.js file:
// This will load the index.html file from /public folder
app.use(express.static(path.join(__dirname, "public")));
Create a new file called index.html in the same directory as index.js and add the following code:
<!DOCTYPE html>
<html lang="en" class="h-100" data-bs-theme="auto">
<head>
<meta charset="UTF-8">
<meta name="description" content="Quick OpenAI ChatGPT SearchBot with Node.js">
<meta name="author" content="Austin Noronha @buzzingcode">
<meta name="viewport" content="width=device-width, initial-scale=1.0">
<link rel="icon" type="image/png" href="/favicon.png">
<title>Quick OpenAI ChatGPT SearchBot with Node.js</title>
<link href="https://cdn.jsdelivr.net/npm/bootstrap@5.3.2/dist/css/bootstrap.min.css" rel="stylesheet" integrity="sha384-T3c6CoIi6uLrA9TneNEoa7RxnatzjcDSCmG1MXxSR1GAsXEV/Dwwykc2MPK8M2HN" crossorigin="anonymous">
<script src="https://cdn.jsdelivr.net/npm/bootstrap@5.3.2/dist/js/bootstrap.bundle.min.js" integrity="sha384-C6RzsynM9kWDrMNeT87bh95OGNyZPhcTNXj1NW7RuBCsyN/o0jlpcV8Qyq46cDfL" crossorigin="anonymous"></script>
...
</head>
<body class="d-flex h-100 text-center text-bg-dark">
<div class="cover-container d-flex w-100 h-100 p-3 mx-auto flex-column">
...
<main class="px-3">
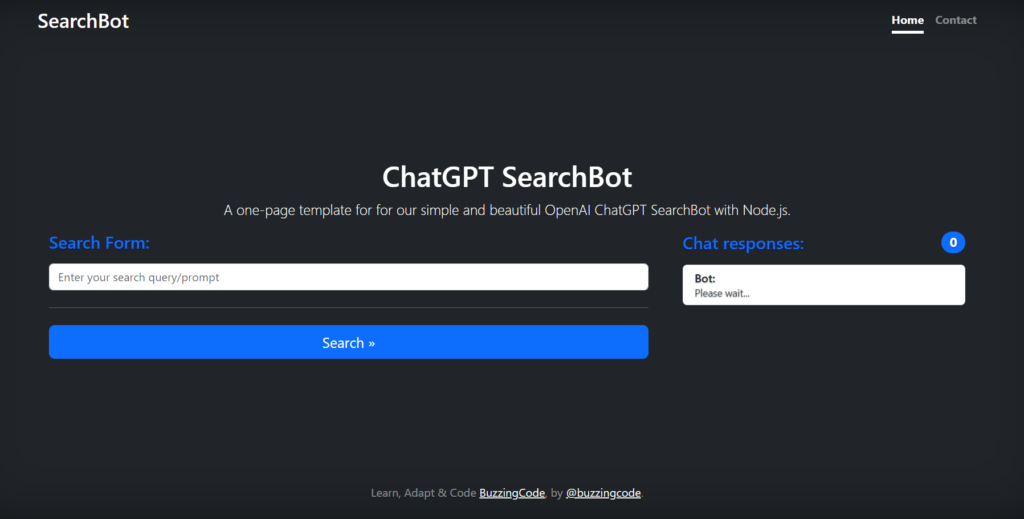
<h1>ChatGPT SearchBot</h1>
<p class="lead">A one-page template for for our simple and beautiful OpenAI ChatGPT SearchBot with Node.js.</p>
<div class="row g-5">
<div class="col-md-7 col-lg-8">
<h4 class="d-flex justify-content-between align-items-center mb-3">
<span class="text-primary">Search Form:</span>
</h4>
<form id="myform" class="needs-validation gy-2 gx-3 align-items-center">
<div class="col-auto">
<label class="visually-hidden" for="autoSizingInput">Search Prompt</label>
<input type="text" class="form-control"id="prompt" placeholder="Enter your search query/prompt" value="" required="" />
</div>
<hr class="my-4">
<button class="w-100 btn btn-primary btn-lg" type="submit">Search »</button>
</form>
</div>
<div class="col-md-5 col-lg-4 order-md-last">
<h4 class="d-flex justify-content-between align-items-center mb-3">
<span class="text-primary">Chat responses:</span>
<span class="badge bg-primary rounded-pill responses-count">0</span>
</h4>
<ul class="list-group mb-3 pre-scrollable" style="max-height: 45vh; overflow-y: auto;"id="responses">
<li class="list-group-item d-flex justify-content-between lh-sm default-set">
<div>
<h6 class="my-0 text-start">Bot:</h6>
<small class="text-body-secondary">Please wait...</small>
</div>
</li>
</ul>
</div>
</div>
</main>
...
</div>
<h1></h1>
<script src="https://code.jquery.com/jquery-3.6.0.min.js"></script>
<script>
$(document).ready(function() {
const response_template = (user, msg) => {
const li = $('<li></li>').html('<div><h6 class="my-0 text-start">'+user+':</h6><small class="text-body-secondary">'+msg+'</small></div>').addClass('list-group-item d-flex justify-content-between lh-sm');
const el = $('#responses');
el.append(li);
el.animate({scrollTop: el.find('li:last').offset().top}, 100);
var cnt = el.find('li').length || 0;
$('.responses-count').text(cnt);
}
$('#myform').submit(function(event) {
event.preventDefault();
const my_prompt = $('#prompt').val();
if($('#responses > li').hasClass('default-set')){
$('#responses').html('');
}
response_template('User', my_prompt);
$.ajax({
url: '/search-bot',
method: 'POST',
contentType: 'application/json',
data: JSON.stringify({ my_prompt }),
success: function(response) {
response_template('Bot', response);
}
});
});
});
</script>
</body>
</html>This HTML template includes a form with an input field and a submit button. When the form is submitted, it sends a POST request to the /search-bot route with the user’s query. The response from the server is then displayed in the responses div.
Step 5: Starting the Server
To start the Node.js server and view the search bot in action, run the following command in your project directory:
nodemon index.js
Open your web browser and visit http://localhost:3000. You should see the search bot interface with the input field and the response div. Enter a query and click the search button to see the search bot in action.

Common Traits of Successful Search Bots
Building a search bot integrated with ChatGPT is just the beginning. To create a successful and effective search bot, consider implementing the following traits:
- Natural Language Processing: Utilize the power of ChatGPT’s natural language processing capabilities to understand user queries and generate accurate responses. Train the bot with relevant data to improve its understanding of specific domains or topics.
- Contextual Understanding: Incorporate context in the conversation to provide more accurate responses. Maintain a conversation history and pass it along with the user query to provide better context to ChatGPT.
- Error Handling: Implement robust error handling mechanisms to handle cases where ChatGPT may not generate a satisfactory response. Provide fallback options or suggestions to guide users towards finding the information they need.
- User-Friendly Interface: Create a user interface that is intuitive and easy to use. Design the interface to guide users in formulating their queries effectively and provide clear instructions on how to interact with the search bot.
- Continuous Learning and Improvement: Regularly analyze user interactions and feedback to identify areas for improvement. Train the ChatGPT model with new data to enhance its understanding and accuracy over time.
Conclusion
In this article, we explored the process of building a search bot integrated with ChatGPT in Node.js. By following the step-by-step guide, web developers can leverage the power of ChatGPT to create intelligent search bots that can retrieve and provide accurate information to users.
We discussed the usefulness of search bots in various scenarios and highlighted the common traits of successful search bots. Remember, this is just the beginning of your journey into the realm of AI-driven conversational interfaces. The sample code for this project is available on my GitHub repository at austinnoronha/nodejs_openai_chatgpt_sample_app, providing you with a solid foundation to kickstart your own projects. Feel free to experiment, tweak, and expand upon this foundation as you delve deeper into the fascinating fusion of Node.js and ChatGPT.
With the right implementation, a search bot integrated with ChatGPT can greatly enhance user experiences and streamline information retrieval on your website or application.
Happy coding!


